Thursday, 28 February 2013

ABC Chicken Soup


It's yucky outside and hubs has a bad cold that seems to be slowly making its way to the kids. I seem to be immune so far (unfortunately...I really would like a sick day once in a while)!

I thought what could be better than yummy chicken noodle soup - with a twist.  Our theme this week is the Alphabet, so I decided make it with ABC's  - that way Lady & Bug will gobble it up and learn at the same time.

ABC Chicken Soup


1 Tbsp. Olive Oil
1 chicken breast, cooked & diced
1 onion, diced
2 large carrots, diced
1-2 celery stalks, diced
6 cups Chicken Stock*
1 cup Alphabet Pasta
Salt & Pepper

*I make my own stock so it has lots of flavour already. If yours doesn't just add some thyme and oregano (that's what I put in my stock).

Cooked the chicken breast on a broiler pan in the oven (about 20 minutes at 350 F) while sautéeing the onion, carrot & celery in a large soup pot. Dice the chicken and add it to the veggies. Cook for a few extra minutes to combine the flavours. Add the chicken stock. Bring to a Boil. Add the pasta and cook for about 5-10 minutes more (until the pasta is soft). Add salt & pepper as desired and serve with hot cheesy biscuits.

Yummy comfort food for a cool, rainy day on the west coast!

~Adel~

Note: Alphabet Pasta can be found in your local grocery store. I found mine at my local Safeway (canada)...but it wasn't at the Safeway in the US that I occasionally shop at. I have seen it at Walmart too. I found it in the pasta isle, but if it's not there check in your international or mexicain isle- look really closely - it doesn't look like all the other pastas. I found the Catelli Brand. It comes in a small box (375g - about the size of Mac & Cheese), they also have stars and rings if you want other fun shapes. 


Wednesday, 27 February 2013

Individual Beef & Cheese Enchilada Wraps

Sometimes you just need something in the freezer that only takes a couple of minutes and is tasty and filling. 

These are a great solution to a busy family's schedule - many of us are juggling sports, school, art classes, work, and the million other things that come with being a parent. If your family is 1 or 2, this makes cooking for yourself or 2 a little easier.


Individual Beef and Cheese Enchilada Wraps

1 lb Ground Beef
1 can (398 ml) Refried Beans
3 cups Monterey Jack Cheese (shredded)
3 cups Cheddar Cheese (shredded)
1/2 package (125 g or 4 oz) Plain Cream Cheese
2 cups Salsa
1 Onion, diced
2 tsp Cumin
1 package Taco Seasoning (for homemade seasoning use 1/4 cup taco spice mix and 1 Tbsp flour)
8-10 Soft Tortilla Shells


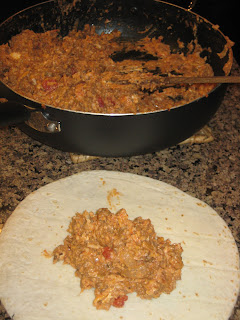
Brown ground beef and break into fine chunks. Add onions and cook until they are transparent. Add taco seasoning (and flour) and cook for 2 minutes. Add refried beans.

In a separate bowl, combine the shredded cheeses and the cream cheese along with the cumin and salsa. Mix well.

Add cheese mixture to the warm meat mixture. Mix well and let the cheese melt a bit.


Place a large spoonful of filling into each tortilla shell and roll.


Freeze them on a cookie sheet in a single layer.


Once they are frozen, wrap each one in plastic wrap and put into a labelled freezer bag.


Ooey gooey cheesy goodness. 

Warm in the microwave for 2-3 minutes or bake on a cookie sheet at 350 F for 20 minutes. Top with salsa, guacamole and sour cream. 

I started making them wrapped like a burrito so they could be eaten individually instead of as a family dish to replace the lovely frozen Chimichangas in my freezer.  The big and little kids in my house LOVE these and they freeze really well.

Now the big people in my household can't say "there's nothing to eat" any more, all they have to do it open the freezer, unwrap an Enchilada and microwave it! 

Enjoy!

~Adel~

Tuesday, 26 February 2013

Quiet Activity Bag


I'm tired of scrounging around the house every time we go to the Doctor's office, a restaurant, or any other place that requires waiting with 2 year olds - it's not very fun to go without something for them to do, so I decided it was time to put together a bag to keep in the car.

First I put together some crayon cases. Lady & Bug love to colour and the crayon's are always getting broken in the plastic bag I carry around in my purse.


I was given these wipes containers as a shower gift when I had Lady & Bug and don't need them any more, so I decided to use them for a colouring box.


I just took a handful of crayons out of the big box and put them into the wipes box...easy!


A random assortment of small toys & books to keep them entertained...quietly. You could pretty much use any toys your kids like, but knowing Lady & Bug, this will keep them happy at a restaurant for at least 15 minutes..maybe enough time to wait for the food if we're lucky!


I included two small board books, cars, little people, mini etch-a-sketch, and tiny play doughs.


It all fit nicely into a little bag I had kicking around from my alma mater - Go Bearcats!

Now let's see if we can survive going out for dinner tonight!

~Adel~

Saturday, 23 February 2013

Oven Fried Chicken

My little Lady & Bug LOVE fried chicken and Shake & Bake, but it's so unhealthy, so I've tried to find a healthier version. If you find something healthy a toddler will eat, you make it!


Oven "Fried" Chicken

10-12 chicken drumsticks or thighs
1/4 cup + 1 Tbsp. Flour
1 egg
3 Tbsp. Milk
1 Sleeve of crackers (any kind you want)
1 Tbsp. Flour
1 tsp. Thyme
1/2 tsp. Paprika
1/2 tsp. Oregano
1/2 tsp. Garlic Powder
1/4 tsp. Ground Black Pepper
1/8 tsp Salt (optional)
2 Tbsp. melted butter (optional)


On a plate, combine flour & 1/8 tsp. black pepper.


In a bowl combine milk & egg


In another bowl, combine sleeve of crackers (crushed), 1 Tbsp flour, paprika, thyme, oregano and 1/8 tsp. pepper.


Dip the chicken drumstick into the flour and shake off the excess. For a healthier option remove the skin.


Dip the floured drumstick into the egg & milk mixture and coat evenly.


Do the same in the cracker crumb mixture.


Lay them on a cookie sheet with space between them. You can drizzle a little melted butter on top of each or spray with cooking spray if you would like the "fried" crispy skin.


Bake in the oven @ 375 F for 45-55 minutes until meat is no longer pink inside.


Lady LOVES this chicken, she licks it and says, "yum - it good mommy" between every bite!

Happy to oblige little Lady!


~Adel~


Friday, 22 February 2013

30 Second Kool-Aid Play Dough


Lady & Bug are really into play dough. Maybe we'll call it obsessed.

Pee-dow (as they call it) is not exactly a cheap thing to buy when you have 2 year olds who mix the colours together and get really upset about it. To avoid the tears I need a fresh supply on hand almost every day. They also like to eat it - seriously, how can they think play dough taste good? I'm not really excited about them eating the stuff from the store so I've been trying recipes.

After fiddling with several recipes, I finally came up with a recipe that's super easy, smells great, and stands up to my kids.


30 Second Kool-Aid Play Dough

1/2 cup flour (225 ml)
1/4 cup salt (59 ml)
1 tsp Cream of Tartar (5 ml)
1/2 Tbsp Oil (7.5 ml)
1/2 cup boiling water (125 ml)
1 package Kool-Aid (we used Cherry, Orange, Lemonade, Lime, Ice Blue, & Grape)


Fill the kettle and boil some water. Mix the dry ingredients together.


Combine the oil, water and Kool-Aid together in a measuring cup and pour into the dry ingredients slowly.


Mix well and let cool. 30 seconds, that's it!

Once mixture has cooled, knead the dough until becomes smooth and soft, use more flour if needed to make the dough the right consistency.


This recipe can easily be doubled or quadrupled if you want a lot, but I like the smaller recipe so I can make many different colours. The Grape is my favourite! Bug tells me that the blue one smells funny.


Now I need to learn to make cool shapes out of play dough.

Wednesday, 20 February 2013

Freezer Meals: Filling the Freezer in One Day!

Days of thought an preparation go into a big cook day, but the reward is a freezer full of pre-made meals that take only minutes to make each day rather than hours.

No more thinking about what to make each day, wondering if I have all the ingredients. I just pick a meal out of the freezer the night before and let it defrost in the fridge, then pop it into the slow cooker or oven.

Freedom from the kitchen and more time to play with my kids!

It's big cook time!

Before I get started I make sure I'm prepared. If you haven't already read it, read my last post about Preparing for a Big Cook. I plan my meals, get my ingredients, and have my kitchen ready for this day.

I make a list of the meals in the order I plan to make them. The order depends on the meals I'm making each time, but I usually start with the meal that takes the most time. Pasta sauce, chicken stock, chilli, or soup require simmering time so they are usually first. If I'm starting in the morning I'll often put the stock on the night before in the slow-cooker so it's ready to be used in the morning. Next, I make anything that is required for another recipe (like meatballs or tortillas). Then it's on to the difficult/time consuming recipes (Lasagne or Manicotti). Finally I do the remaining recipes.


My meals usually require two kinds of meat; ground beef and chicken breasts. If I need pre-cooked meat for a meal I brown the beef together all at once and divide it up for each recipe. While the meat is browning I also turn on the oven and put my chicken breasts on a broiler pan @350 for 20 minutes (or until cooked).


While the meat is cooking and the sauce is simmering, I start preparing the veggies and cheese. The food processor is my best friend for this task! Huge blocks of cheese can be reduced to shredded mounds in seconds and it saves the tears when slicing bags of onions.


Once I have all the meat, sauces, veggies and cheese prepared, I start to assemble meals.

One meal at a time, I boil pasta, mix sauces and fillings, arrange, layer, stuff and roll the more time consuming meals.

The Lasagne is done...


The Enchiladas are filled and laid out on cookie sheets for freezing in individual portions...


Now I move on to the dump and pour meals - my favourite because they are so satisfying!

I store most of my meals in freezer bags to save space. They are all pre-labelled with the name of the dish, any ingredients that need to be added at cooking time, cooking instructions, and the date. I also include the number of servings as I make several different sized meals.

To make this task a whole lot easier, I discovered that some of my storage containers hold my freezer bags open to make for easy filling.


I use a measuring cup. Starting with the meat - dump the required amount into each bag, then move on to the veggies, sauces, and any other ingredients needed to finish the meal.

If everything is already prepared, this step takes very little time!


Finally I seal the freezer bags, cover the baking dishes with plastic wrap and aluminium foil, and make sure everything is labelled correctly before cooling it and putting it all in the freezer.


Here are the meals I made this time: (recipes coming)

Warming Chili (x2)
Spinach Lasagne (x3)
Manicotti (x2)
Slow Cooker Beef Stroganoff(x2)
Meatloaf (x2)
Hawaiian Chicken (x2)
Beef Enchiladas (x3) (yes, I forgot to take them out of the freezer when I took the final picture!)

For a grand total of 16 meals in 4 hours.

Now that's a productive day. My feet hurt and I'm ready for a glass of wine and a PVR'd episode of Bunheads.

Happy Cooking!


Monday, 18 February 2013

Freezer Meals: Preparing for a Big Cook


My least favourite part of my day is deciding what to make for dinner.

I have a hectic life with the kids and the people we care for. I regularly make dinner for 7 or more people and it's hard to find time during the afternoon to make meals. I would much rather spend that time with my kids instead of slaving in the kitchen with two kids hanging on my legs and everyone else telling me how hungry they are. 

Over the years I've devised a menu plan and regularly do Big Cook days where I make several meals and freeze them to help make my life a little easier down the road. My freezer stash is my pride and joy. I'm the kind of person that needs to see results to feel satisfied...parenting and home-making don't exactly provide you with instant results very often, so this is my outlet!

I know I'm not the only busy mom in this world, so here's a few of my tips to preparing for a Big Cook day!

  • Make sure you have freezer space. Buy a bigger one if this is going to be part of your cooking routine!
  • Go through your recipes and find your family's favourites...the ones you eat regularly. Choose the recipes that can be made ahead and frozen for your big cook day.
  • Start small. Try three meals and work your way up.
  • Plan to get someone to look after your kids and keep your man out of the kitchen for the day (unless he's willing to help). Better yet, get him to take the kids out while you work!
  • Go through each recipe and write down the ingredients you need for each one. Go through the list and see what you have on hand in your freezer, your pantry, and your cupboards. If you don't have the item or enough, put it on a grocery list. Remember to check your spices and produce too!
  • If your meat is frozen take it out of the freezer and put it in the fridge the day before to thaw (only if you plan to cook it - always a better idea to use fresh meat for freezer cooking).
  • Shop for your missing ingredients. Don't forget freezer bags, plastic wrap, aluminium foil, or containers to freeze your meals in.
  • Clean your kitchen, clean your counters & table off,  and do all the dishes before you get started. I even sweep the floor to help me focus (the mess makes me distracted). This way you will have space and all the tools you need to get cooking.
  • If you are using recipes that your family already loves, double, triple or quadruple them. It's the same amount of work in most cases to make 4 as it is to make 1!
  • Label all of your freezer bags or containers with the name of the dish, the date, and the cooking instructions. I also include the number of servings as I make different sizes.
  • I have three containers that fit my large freezer bags and I use them to hold the bags open for easy filling (Search your kitchen for something that works. Juice jugs work well).
  • Put all your ingredients out where you can easily access them.
  • Put out all the tools you need; mixing bowls, frying pans, pots, food processor, etc.
  • Write down your list of meals in order you want to make them.
  • Designate a spot on the counter for the meal you're making and focus on one at a time (but if something needs to simmer, move on to the next meal preparation.
  • Start with the meal that takes the longest or requires simmering. (I start with pasta sauce or soup stock).
  • Wear something comfortable, don't forget about some shoes with support...you're gonna be on your feet for a long time.
  • Put on some good music or a movie if you can see the TV from the kitchen.
  • Get yourself a big glass of ice water and don't forget to eat something high in protein before to get you through. (A big glass of wine helps too!)
Now to start planning your next big cook day!

Find some recipe ideas for freezer friendly meals or slow cooker meals!


Friday, 15 February 2013

Lil' Artists

My kids watch a lot of TV.

It's my coping mechanism - yup, I'll admit it. I turn on Thomas the Train to get the dishes done or tidy or make a meal. Sometimes I even turn it on just to have 15 minutes of peace to check facebook.

It's an easy babysitter, but at only 2, they watch hours of TV throughout the day just so I can get things done.

Today I decided that it was time to turn the TV off and spend some time being artistic.

I have a confession to make. I'm not a crafty sort of person. I try really hard, but I have no follow-through and would much rather spend my evenings reading a book with a glass of wine than crafting!

So, crafting with my kids is a bit of a stretch. We're starting small - making art for Grandpa Ladybug's birthday.

First, it required some supplies, so a trip to the local dollar store was in order.

Supplies:

  • Smocks (I would recommend this. My kids refused to wear them and we opted for PJ's instead)
  • Canvas or painting boards ($1 at the dollar store for small ones)
  • Washable paints
  • Paint brushes
  • Small bowls
  • Water
  • Rags for clean up


 The little artists deep in concentration. I had no idea they loved to paint this much!


  Painting a giraffe on a hill...


...and of course, another giraffe.


The Finished Product


Giraffe by Lady


Giraffe on a Hill by Bug


Happy Birthday Grandpa!